
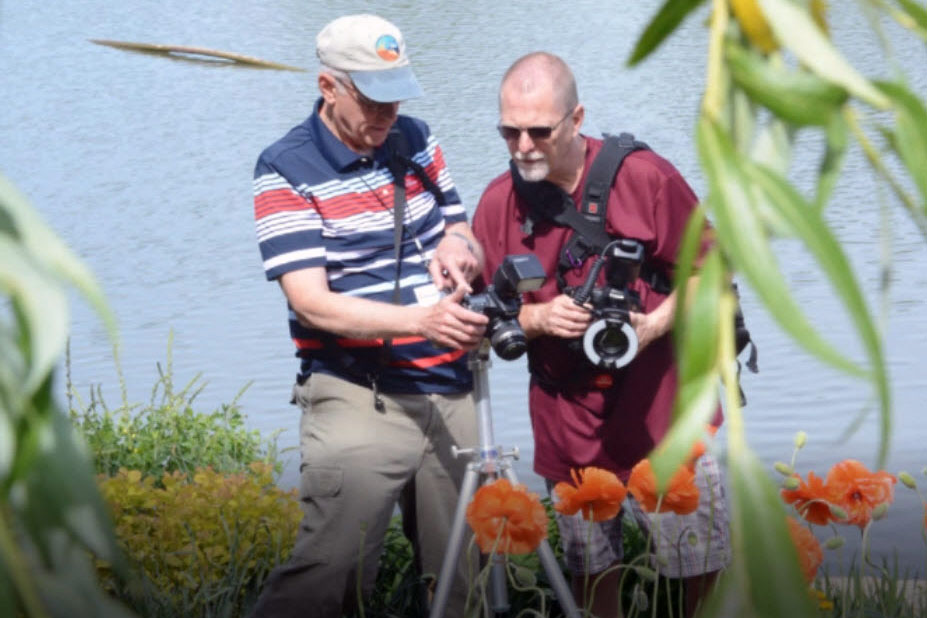
Tips for New Photographers
I love it when eager new photographers get their first DSLR (Digital Single Lens Reflex) camera. Their minds are racing with creative ideas but sometimes they're a little hesitant and don't know how to get started. I offer classes on a wide range of topics but here are a few things every photographer should understand.
For new photographers, these are my initial recommendations:
• Take lots and lots and lots of pictures. Initially, just put your camera on automatic and go crazy. Take shots of the family, the neighbors, the dog. Shoot flowers, cars, the bricks on your house, and the bark of a tree. Just play with your camera and have fun. Take thousands (yes thousands) of pictures.
• Get close to your subject! You don't need to see feet in every picture of your family. Zoom in to reduce distractions. Fill the frame with the most important part of the image. Sometimes just a portion of the face filling the frame will tell the story.
• Climb up, lay down, move right, move left, zoom in, zoom out! Very few quality images are taken from the sidewalk in a standing position. Don't be afraid to move into various positions with different perspectives on your subject. Whenever you move, the lighting will also change so don't be afraid to experiment.
• Review your images! The only way to get better is to review your images. Decide what you like and don't like about they way the subject is framed. Look at the effects of the light from various positions. Don't be disappointed if you end up deleting 95% of your images. They are each a learning experience. Professional photographers will shoot hundreds of images only to get 2 or 3 acceptable shots.
• Look at the pictures in books, magazines, and photography websites. Get new ideas and motivation from professional photographers. Can you identify the direction and type of light source, how did that light change the image, what lens did they use, how did they frame the subject, what do you like/dislike about each picture, etc.
• Most of all, HAVE FUN.
Many photographers will be happy to stay at this level. They like the safety of the camera's automatic mode and they just want to capture important memories without worrying about all the technical mumbo jumbo. Others, however, will want to take the next step and get a better understanding of shutter speed, aperture, depth of field, etc. They want to take control of their images in order to achieve next level of creativity. They ask questions like "how do I blur water in a moving stream" or "how do I create those cool headlight trails during night shots" or "how do I get crisp macro images." This is where photography really starts to get fun.
Shutter Speed controls the amount of TIME the film (or sensor) is exposed to light. It is represented in seconds (10 seconds, 20 seconds, etc) or fractions of seconds (1/500, 1/1000, etc). Shutter speeds gives you ability to blur or freeze motion.
This image of a hummingbird was shot using a very fast shutter speed of 1/8000 second in order to freeze his wings.

In contrast, this night exposure was shot at 30 seconds and you see the streaks of car lights in the foreground. The buildings remain clear since they did not move during the entire exposure.


Within the lens, there is a device called an "aperture" that can vary the amount of light the passes through the lens to the camera.

Similar to the pupil in your eye, the aperture will increase or decrease in size to accommodate different amounts of light. Larger openings allow more light to pass and smaller openings allow less light.
Aperture also controls "Depth of Field" (the amount of an image in clear focus).

Large aperture openings (small f-stop number such as f/2.8) produces a narrow depth of field where only the subject is in clear focus and the background is blurred. This is ideal for portraits.
The image of the young boy was shot at f/2/8 and has a very narrow depth of field. The background is soft and burred to minimize distraction and focus your attention on the child.

Small aperture openings (large f-stop number such as f/16 or F/22) produce larger depth of field where the subject, foreground, and background are in clear focus. This is ideal for landscape photography.
This image on the right of the water flue was shot at f/16 and has a very large depth of field. Everything is in clear focus.
 ISO should be used to support the aperture and shutter speed you select. You may need to increase or decrease the ISO to achieve the sensitivity for the proper exposure. As aperture or shutter speed decrease the amount of light, the ISO should increase proportionally.

ISO refers to the sensitivity of your film, or digital sensor, to light. The higher the ISO number, the more sensitive to light. Many of the new digital cameras allow you to adjust your ISO to a wide range of settings from 50 to 128,000 or more.
High ISO numbers allow you to shoot in low light conditions but the unfortunate consequence is that they introduce more digital noise to your image. Each camera is different but generally I urge caution above an ISO 3200 or so.
Lower ISO numbers produce less digital noise and are appropriate for well lit shots or when using a flash. Most photographers try to use the lowest ISO possible in order to reduce digital noise while still achieving the shutter speed and aperture required to get the needed exposure.
In normal conditions I try to use an ISO in the range of 100 to 1600. I've found that range will provide a balance between image quality and adequate sensitivity,

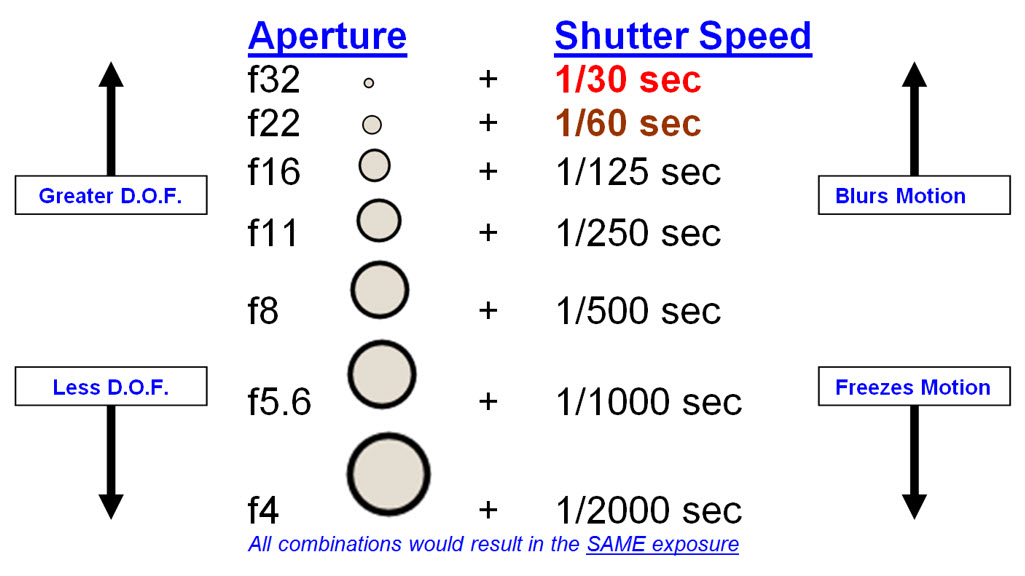
A "stop" is a term for doubling or cutting in half the quantity of light. Originated from the mechanical stops on old cameras it allows you to make similar changes in different controls while maintaining the same exposure.

OR

In the chart below you'll see examples how one "stop" in ISO, Shutter Speed, and Aperture will double or cut in half the amount of light. Use these 3 settings in combination to achieve the desired exposure, depth of field, and motion blur.

Every camera is different in the placement of their controls, their icons, appearance of their display, terms, etc. It would be impossible to provide accurate information on every brand and model so I would encourage you to review one of these sources regarding your camera:
• Your owners manual
• The manufacturers website
• YouTube (https://www.youtube.com/) Just search for your model of camera
Understanding the basic functionality of your camera is critical to taking better pictures. On this page, I'll just cover a few basic concepts common to all DSLR and mirrorless camera.

FULLY AUTOMATIC MODES
Automatic Exposure (A) - Camera has complete control over exposure, point-and-shoot operation.
Portrait - Apertures are kept as large as possible (small F number) to produce a shallow Depth of Field (blurred background).
Landscape - Apertures as small as possible (large F numbers) for the largest depth of field.
Close-up (Macro) - Aperture is kept to a medium setting to ensure the subject DOF is deep enough but the background is blurred.
Sports - Shutter speed is kept as high as possible to ensure capture of fast moving objects.
Night Scene - Allows for slow shutter speeds combined with flash to illuminate foreground and background.
SEMI AUTOMATIC (Creative) MODES
Program Auto Exposure (P) - Very similar to AUTO exposure but you have access to all the normal manual controls, can set the ISO, exposure compensation, use AE lock, bracketing etc. The Program AE is flexible which means that you can select one of a variety of equal exposures by turning the main dial.
Shutter Priority Auto Exposure (TV = Time Value) - In this mode you select the shutter speed and the camera will calculate the correct aperture for the exposure (depending on metered value; metering mode, ISO). Shutter speed is displayed on the viewfinder status bar and on the LCD panel, turn the main dial to select different shutter speeds. A half-press of the shutter release causes the cameras exposure system to calculate the aperture, if it's outside of the cameras exposure range the aperture will blink.
Aperture Priority Auto Exposure (AV = Aperture Value) - In this mode you select the aperture and the camera will calculate the correct shutter speed for the exposure (depending on metered value; metering mode, ISO). Aperture is displayed on the viewfinder status bar and on the LCD panel, turn the main dial to select different apertures. A half-press of the shutter release causes the cameras exposure system to calculate the shutter speed, if it's outside of the cameras exposure range the shutter speed will blink.
FULL MANUAL MODE
Manual Exposure (M) - In this mode you select the aperture and the shutter speed from any combination. If you change the exposure, the meter on the viewfinder status bar and LCD will reflect the exposure level compared to the metered exposure.
* Information adapted from Canon USA
Once you download your image to your computer, it's critical that you review your image in order to improve your skills. As you look at the image consider the following:
- Composition
- Background Distractions
- Lighting
- Depth of Field
- Motion Control
Also, take note of your aperture, shutter speed, and ISO. By RIGHT CLICKING on the image and selecting PROPERTIES you'll be able to see the image metadata.

The short answer is always. That's because your images will be more stable and you'll spend more time composing your image. Those two items combination will always produce a better image. In the real world, however, I recognize that using a tripod may not always be realistic so let's look at when using a tripod really becomes critical and why.
When you take a picture holding the camera in your hands your hands invariable jiggle a bit and this can blur your photograph. If you try to hand hold a shot with a one second exposure, for example, I'm sure the resulting picture will be blurred. No ones hands are that steady. In contrast, if you shoot at a shutter speed of 1/2000 of a second, the jiggle of your hands is sure to be frozen and unapparent in the image.
Image blur from shooting at too slow a shutter speed is one of the most common flaws beginning photographers face. If you wonder why all your shots are coming out fuzzy, this would be my first guess. If you learn to shoot your hand-held shots at a shutter speed fast enough to still your hand motion, your photos are likely to start looking a lot crisper.
What is this magical "critical shutter speed" when a tripod is required? It depends on the focal length of the lens. Longer focal length lenses magnify everything, including the jitter from your hands, so they have more stringent shutter speed requirements than wide angle lenses. Here's a good rule of thumb for 35 mm photography:
A tripod should be used when your shutter speed is less than the reciprocal of the focal length of your lens.
That sounds really nerdy but it's actually quite simple. If you're shooting with a 200 mm lens you should use a tripod if your shutter speed is lower than 1/200 second. If you're shooting with a 50 mm lens you should use a tripod if your shutter speed is lower than 1/50 second, etc, etc.
Cropping simply refers to removing a portion of the image before the final print. Sometimes you "electively crop" to improve an image's composition. This document, however, will only discuss the "required cropping" necessary to fit the format of the desired print.
Many people think that an 8x10 print should be exactly the same as a 4x6 print (just larger) but that actually is not the case. The 8x10 will need to be cropped resulting in a portion of the image not showing up on the print.
To better understand this concept you must first know the ratio of your digital image. Don’t confuse image ratio to resolution. Resolution refers to the number of pixels in the image and that is not a factor here.
Ratio refers to the HEIGHT of the image compared to the WIDTH. The ratio depends on the type of camera used. As an example, many high quality digital SLR cameras produce an image with a ratio of 1 (High) x 1.5 (Wide). That means to see the entire image your print must also have a height to width ratio of 1 (H) to 1.5 (W). Whether you're working with centimeters, inches, or feet it really doesn't. It's the ratio of the height and width that determine what will be cropped.
Prints that exactly match the image ratio of your camera do not require any cropping. Examples of full frame prints for an image with a ratio 1 (H) to 1.5 (W) would be 2x3, 4x6, 16x24, 20x30, 24x36, etc. Note that the width of the print is 1.5 times larger than the height. Since the print ratio exactly matches the ratio of the image, no cropping is required.

As an example, in the case of the 8x10 the print width is now only 1.25 times larger than the height. That would require some of the image to be cropped off the sides to fit the format of an 8x10. The chart below provides additional examples. Note the image ratio compared to the print ratio.
